Cleaned and Dried, Ready-to-Craft Gourds For Sale
Gardens and Gourds - February 2006
The groundhog saw his shadow so I guess we have to put up with some more winter.
Since we still cannot start a garden I guess we will just have to keep on crafting our gourds.
Recently I started to make a bowl with a gourd that had a nice size, and a good round shape. Unfortunately I discovered it was fairly thin. So I did what most of us gourd crafters do and I proceeded to line the inside with paper of some sort.
After finishing that part of the project and using some wood filler to smooth out some dents I let it sit for awhile deciding what design I was going to paint on it.
A few ideas came and went and then I decided that I didn't want to put anything on that would take lots of time since I already had plenty of hours in it with just the liner. It wouldn't matter if I was making it for my own use but when you plan on selling one of your creations the more time you spend the more your price should go up.
So instead of painting I decided to try using WalliesŽ as my design. I had never done this and decided to use the experience as a tutorial for my next newsletter.
Here is a picture of the gourd ready to be worked on.
The first thing I did was to do my base color and paint the inside. I let it dry for a few days just to be sure it was ready for the WalliesŽ.

After your base color is done you need to measure around the middle of the gourd. Hold the tape straighter than what I am showing in the picture. I was just posing for the shot.
I was going to use 5 WalliesŽ for my bowl so I divided the circumference by 5.

To help me keep the WalliesŽ level around the gourd I marked a line the whole way around where I wanted the top WalliesŽ to be. My gourd divided evenly by six so I put a mark every six inches at the level where I had made my measurement. Then I drew a line up from the mark to the top line for a guide. It helps me to center up the WallieŽ
One thing I discovered when I was placing my WalliesŽ on the gourd was since the gourd is round you may have some places that won't lay flat and it will wrinkle. What I did was look at the pattern and see where I could make some cuts. In this pattern of leaves and flowers, I cut along petals so that they would overlap the background. It worked quite well.

The WalliesŽ are prepasted so you just dip them in water and then place them on. I had a little trouble with them wanting to slide around and I don't think I would want to use the size I had on a smaller gourd because of the wrinkle factor.
Have a paper towel handy to wipe off any running water and help smooth out the WallieŽ.
You could use this same idea with smaller stickers for small gourds.
After you are sure everything is dry seal with your favorite sealer.
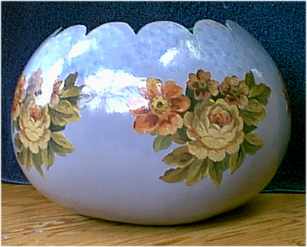
Here is my bowl all finished. Sorry about the glare but it gives you an idea of how nice it will look. So you can create a really nice bowl even if you think you don't know how to paint.
I hope you have enjoyed this tutorial on creating a bowl using WalliesŽ